Add Project Roles and Staff Matching Experts
After creating a project, you can start setting up the team by defining project roles and requirements. iCombine will reveal experts with the best fit to each project role and also show their availability. You can invite or directly assign your experts with the option to book hours. Some or all of these planning rights can also be given to single team members by assigning project permissions for a project.
1. Create a Project Role
Please note that the first project role can only be created by a workspace admin. A workspace admin might delegate the management of a created project to another member by adding a member to a project role and then assigning project permission to that member.
1.1 Add a new Project Role
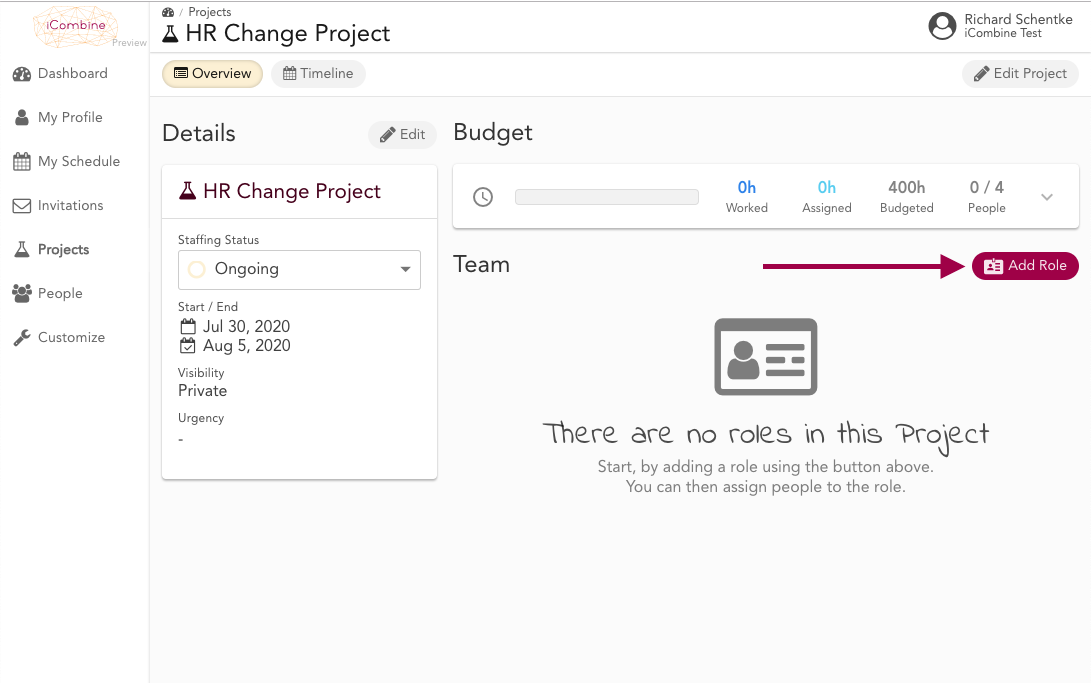
Once you are in the detail view of a project, click on + Add Role to add a new role to the project team.
1.2 Add a Role Name and Description
Now enter a role name and a role description that all invited or assigned experts should see later.
Once you are finished, click on Create Role.

1.3 Add Search Criteria to a Project Role
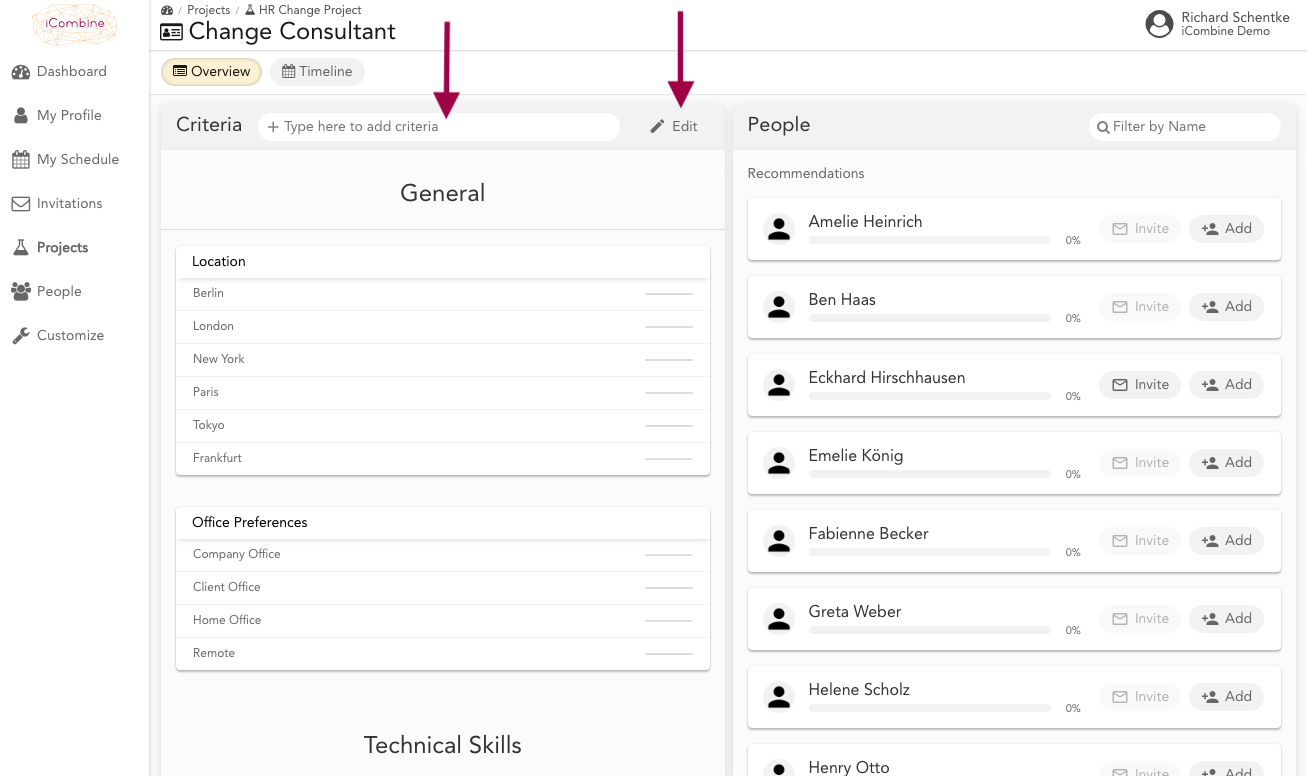
In the following screen, you start to choose all the criteria that you require from the future role owner. The selectable properties are based on the profile catalog that was created for your organization.
You can quickly add criteria using the search bar. Once you start typing, criteria from the catalog are automatically suggested to you. To easily select skills, interests, and other information from a predefined interview, click Edit.
1.4 Select and deselect Criteria from the Interview
After clicking on Edit, you can scroll through the interview on the left side of the screen and read the individual questions. Select all the criteria you are looking for. There are questions with single and multiple answer options as well as numbers.
You can deselect already chosen answers (color-coded) with the X at the top right of the answer.
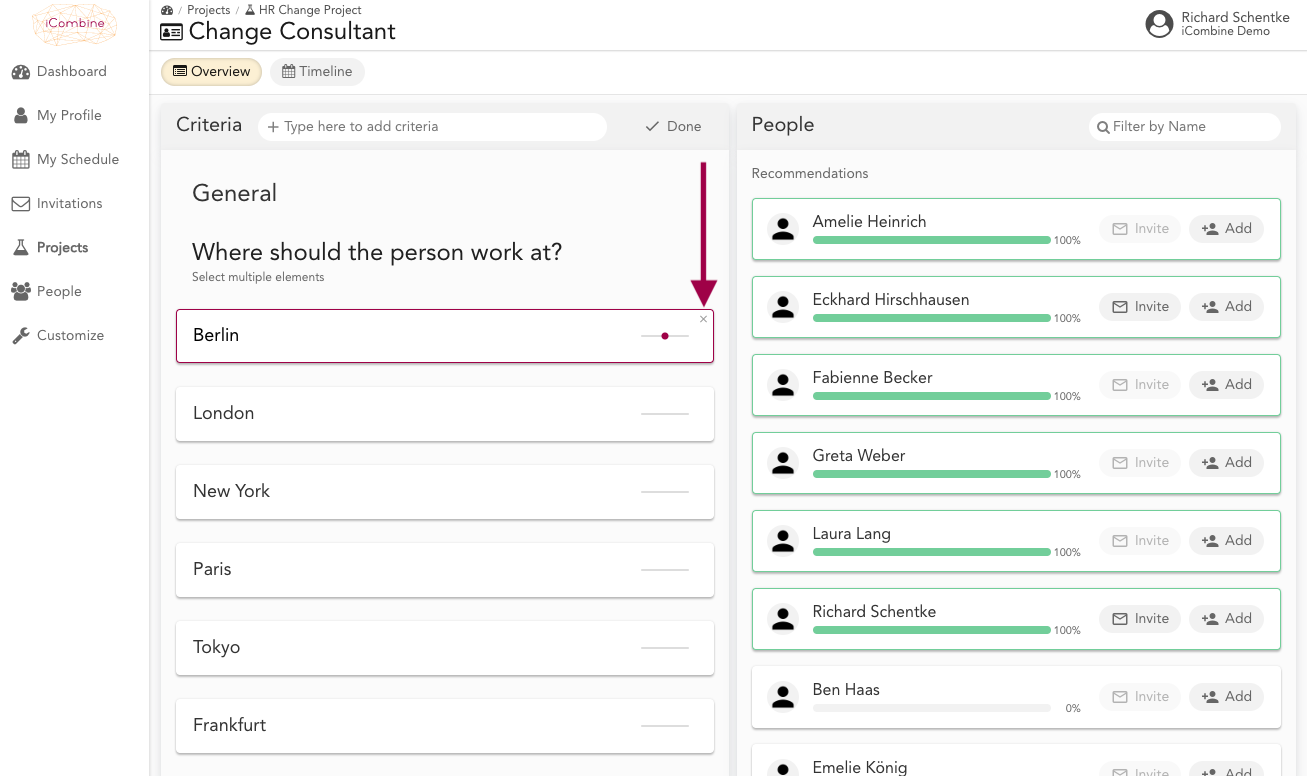
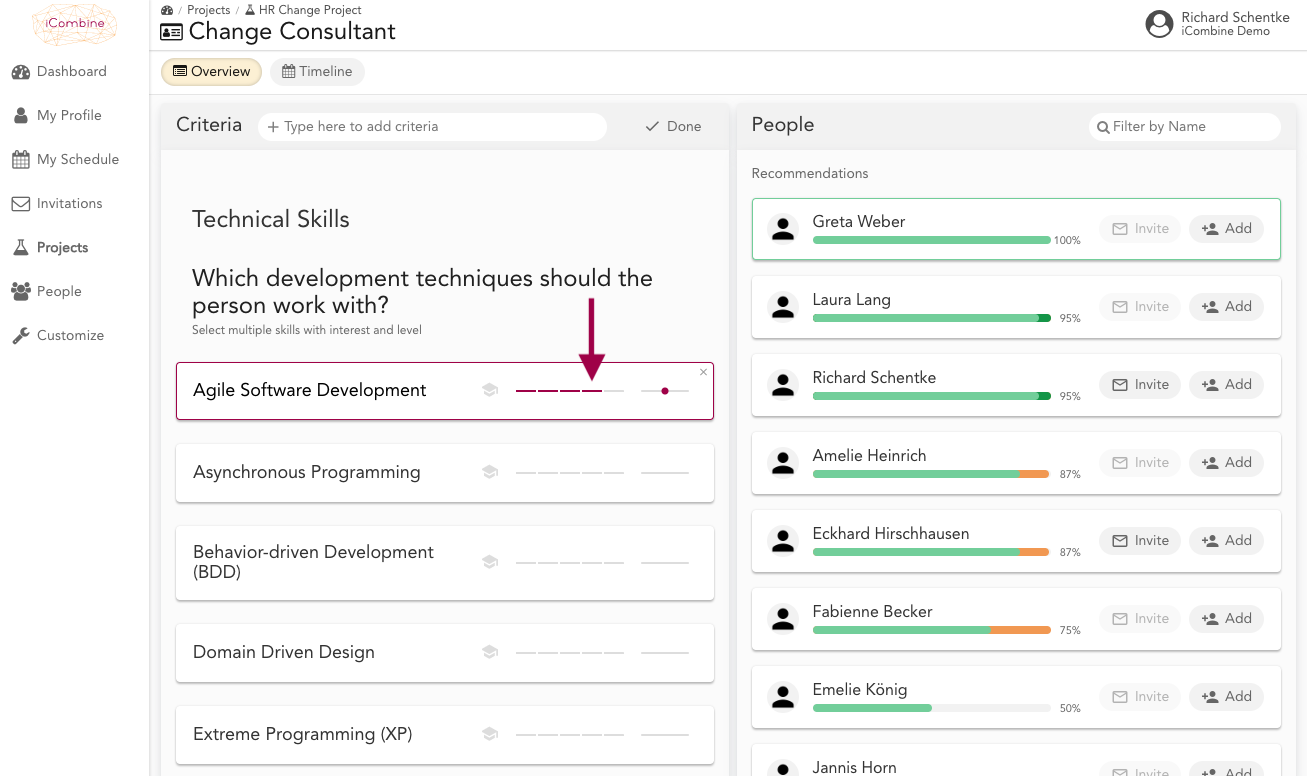
1.5 Select the importance of single criteria
You may increase or decrease the weighting of individual criteria by moving the slider next to an answer to the left (less important) or to the right (very important).
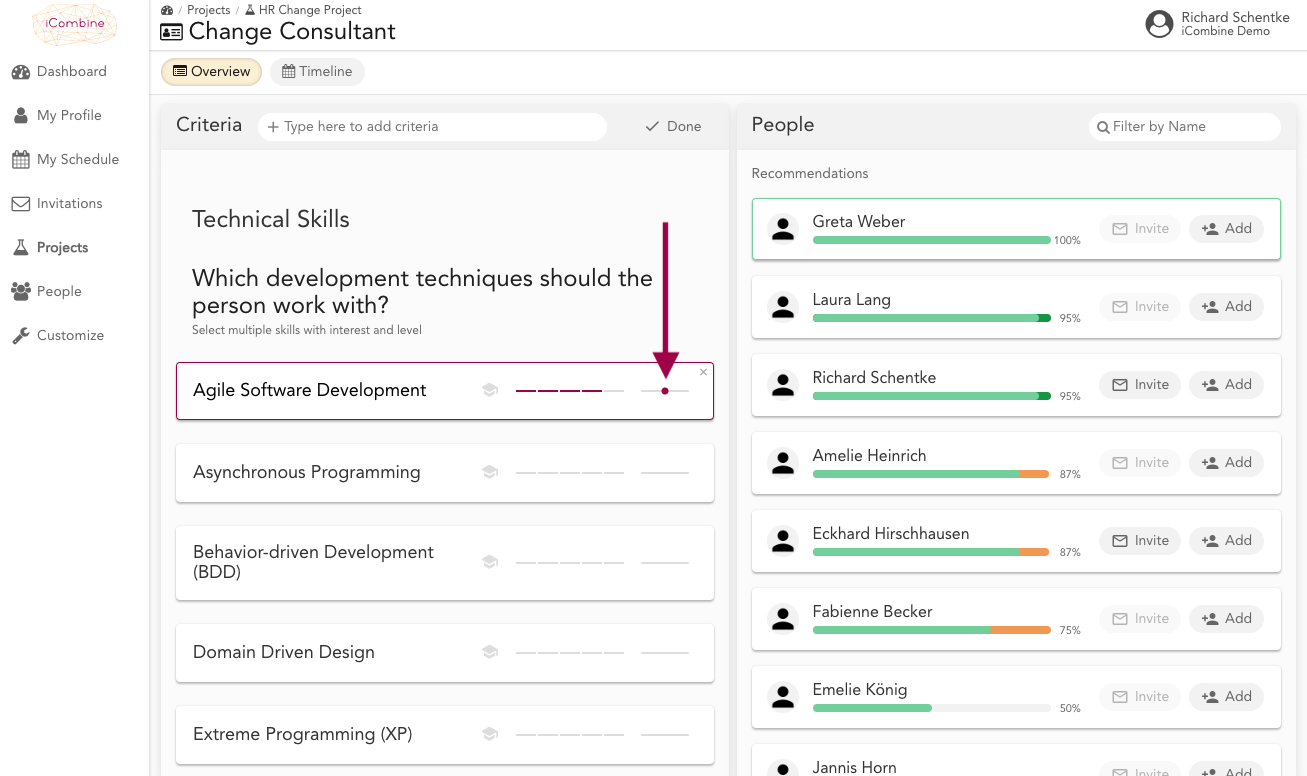
1.6. Select Skill Level
On some criteria, you can select skill level from 1 to 5. To do so, simply hover over the question and then select the desired level.
Recommendation: Each Skill Level means something different. Read the guide to learn more about each individual level.
1.7 View only the selected criteria
To get a quick summary of the previously selected criteria at one glance, click directly on the Selected button next to the quick search. Another click brings you back to the complete profile catalog.

2. Identify matching Experts
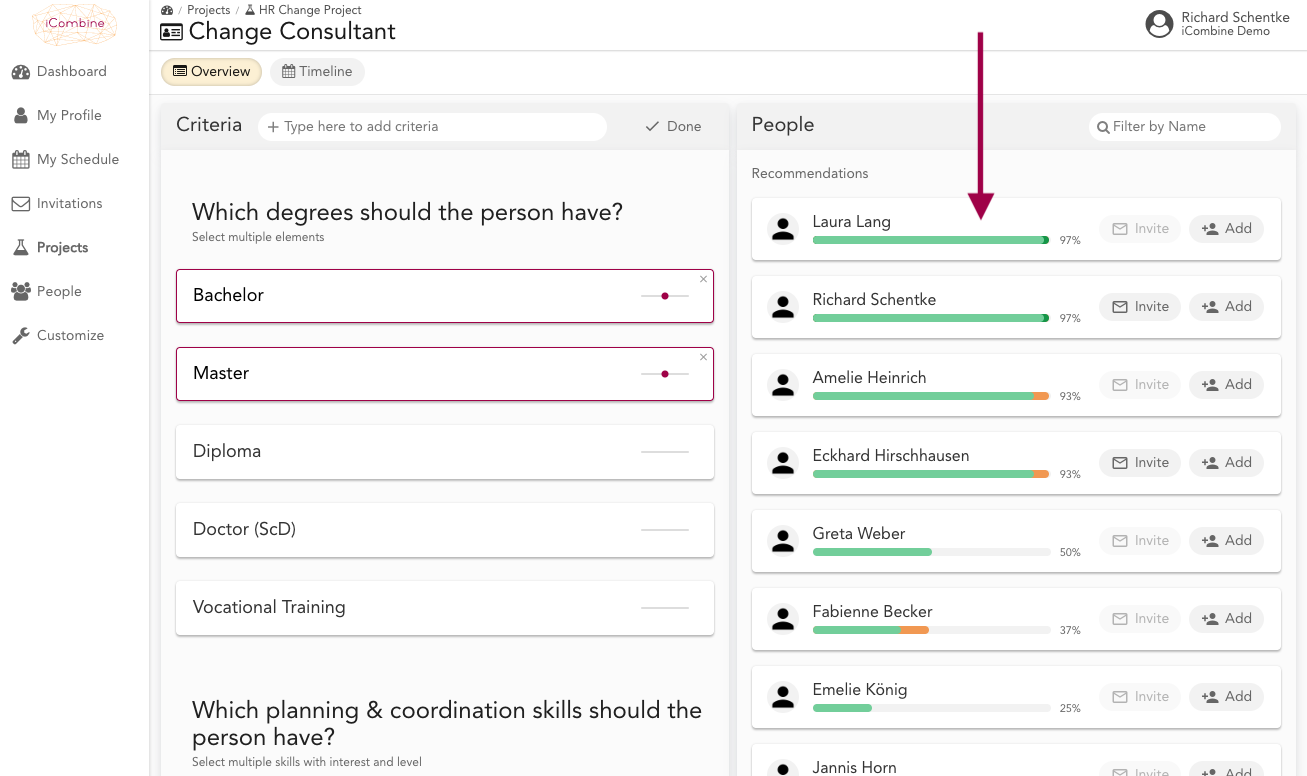
2.1 See Recommendations to Identify Experts with the Best Fit
With every criterion that you enter in the search profile, the list of all experts on the right-hand side is arranged according to the fit accuracy. Move your mouse over a expert to preview the fit. Click on a person for detailed insights.
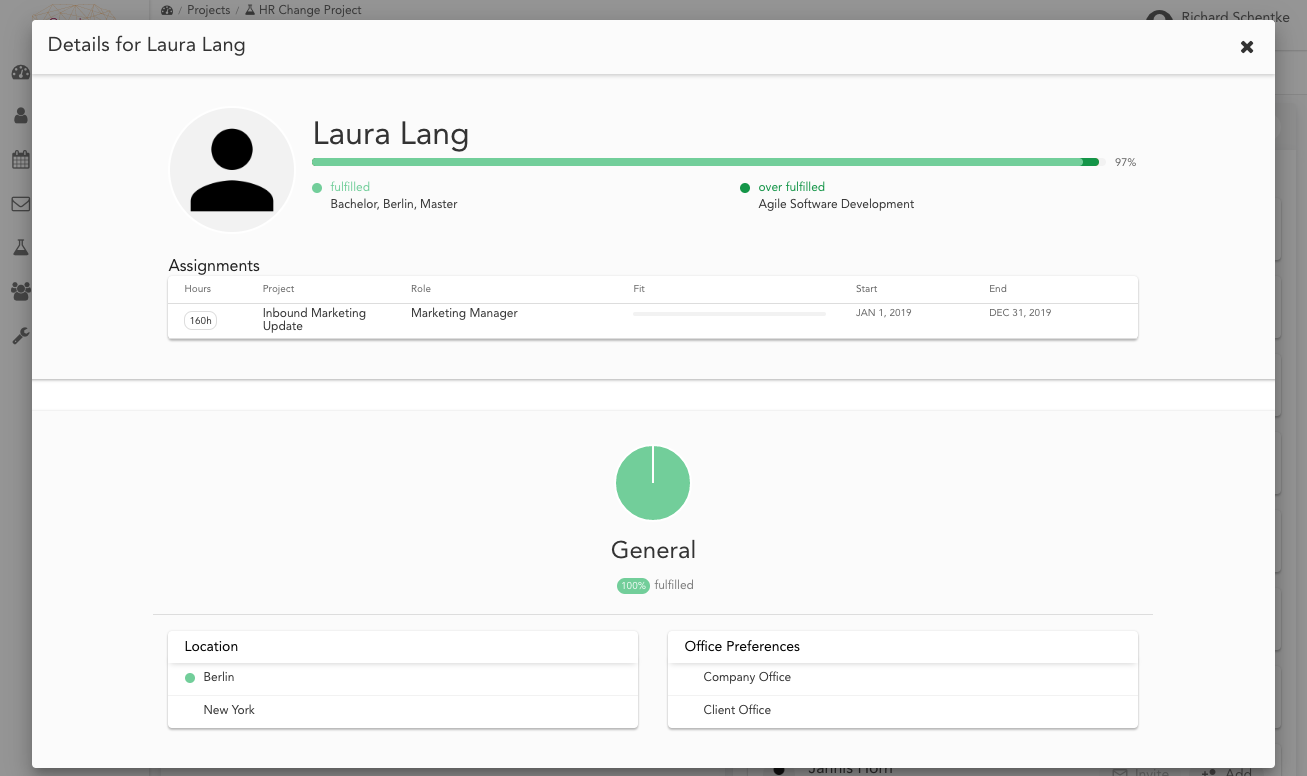
2.1 See Match Details between Role Requirements and an Expert Profile
After clicking on an expert in the recommentation list, you can see exactly how the selected expert matches your criteria and which projects she is currently working on. Please also note the color coding (green, dark green, orange and red).
3. Create your private Shortlist with Favorites
3.1 Select your Favorites
Use Favorites to create your own secret shortlist within the recommendations list before actually inviting or adding other experts.
To add a person to your favorites list, simply click on the star icon. The person will not receive a notification.

3.2 View your Shortlist
When you add another person to your favorites, the person will move under the Favorites label. This is your private shortlist.
Only once you actually invite or add this person, he or she will move up under the corresponding label and then receive a notification.

4. Check the Availability of matching Experts
4.1 Go to the Project Role Timeline
Once you have defined the search criteria, you can check the availability of all recommended experts. Therefore, click on Timeline in the project role overview.

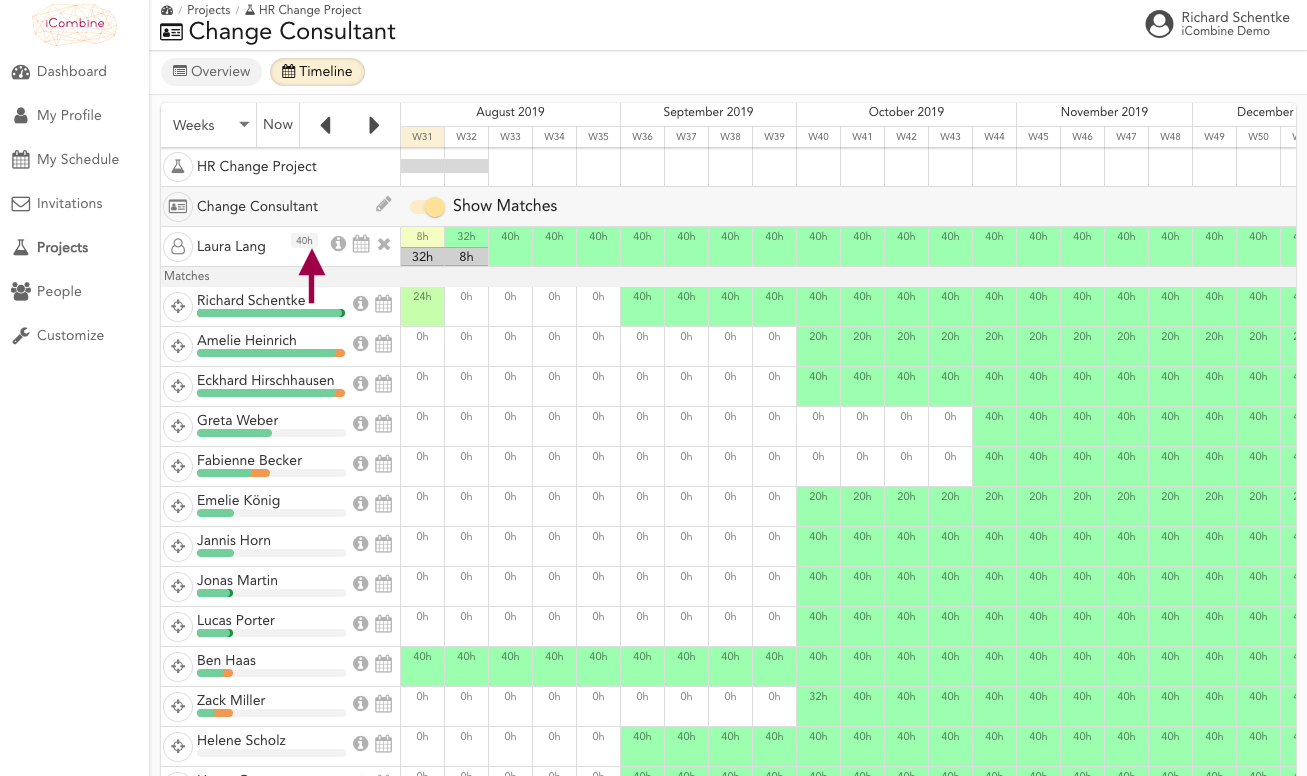
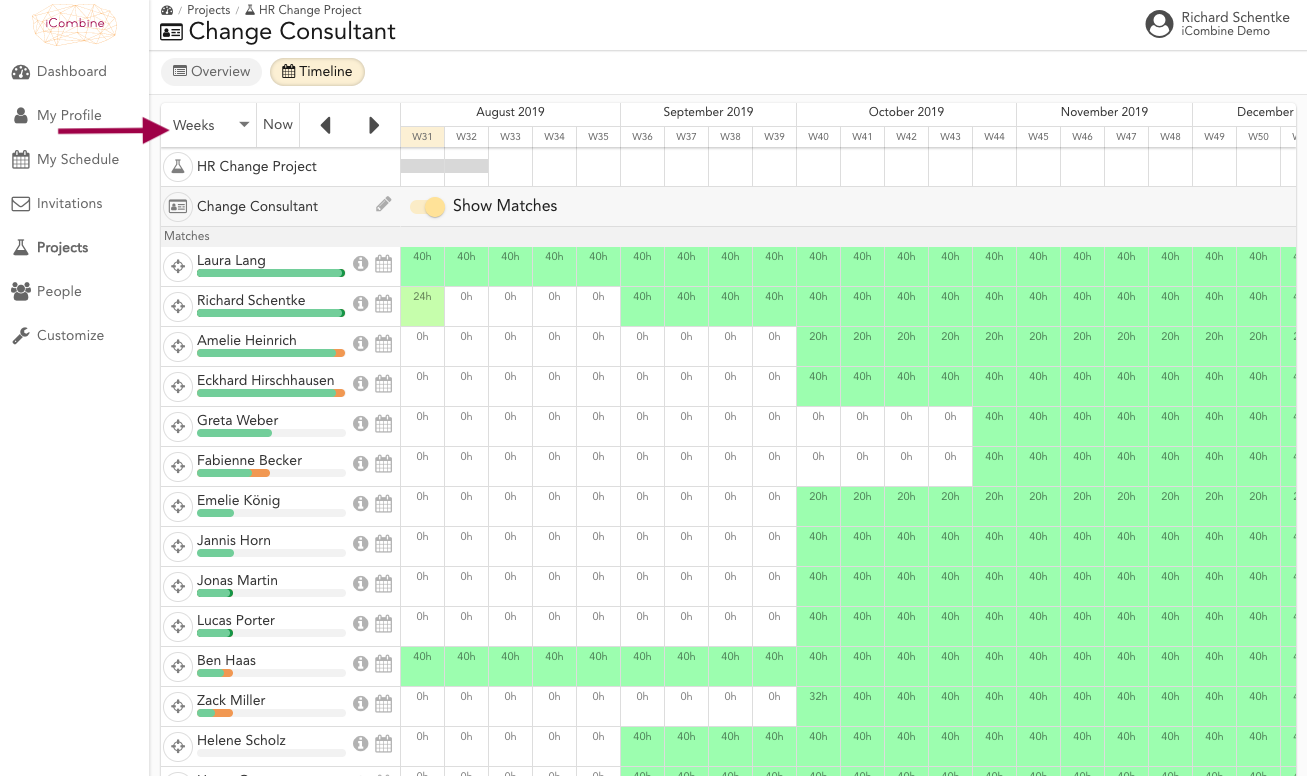
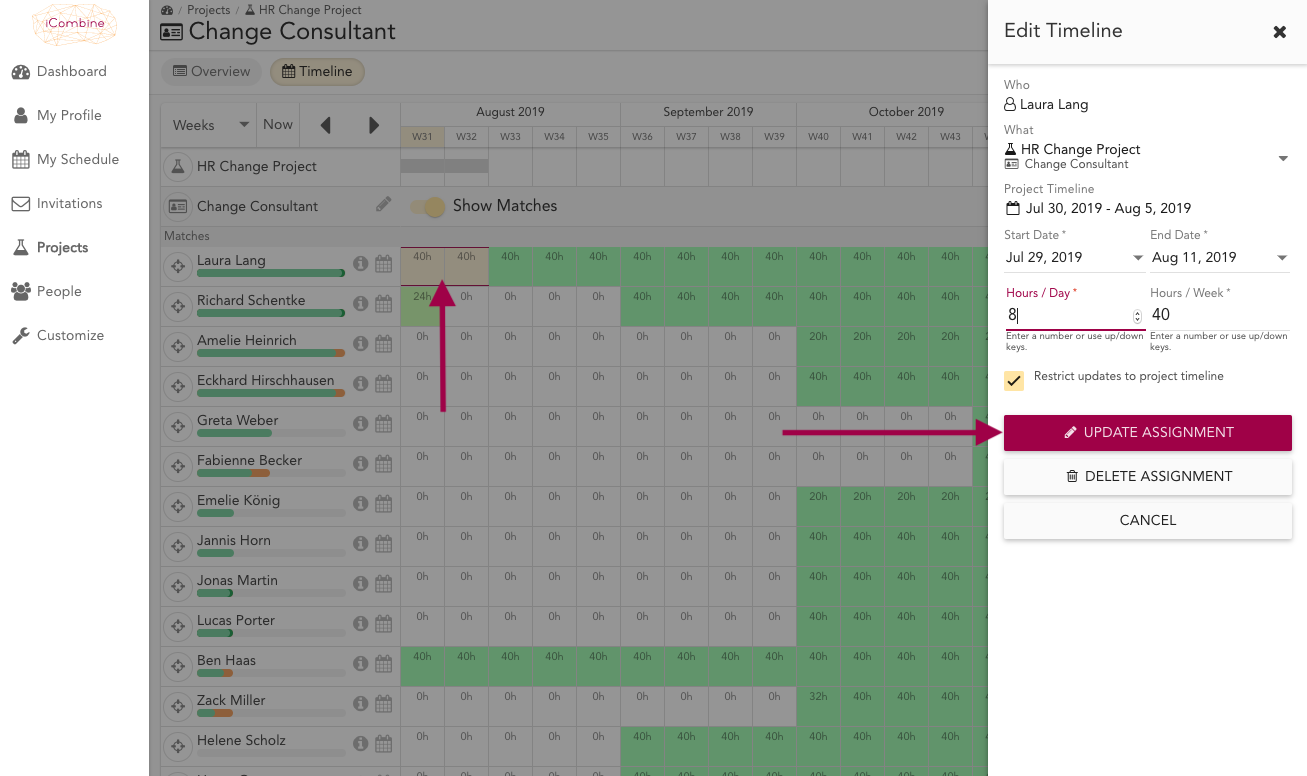
4.2 See the Availability of all Experts
In the timeline, you can see which experts are available. The green color indicates that an expert is free. The number in each field indicates how much time an expert has in the correlating day, week or month.
With one click, you can switch the view between days, weeks and months.
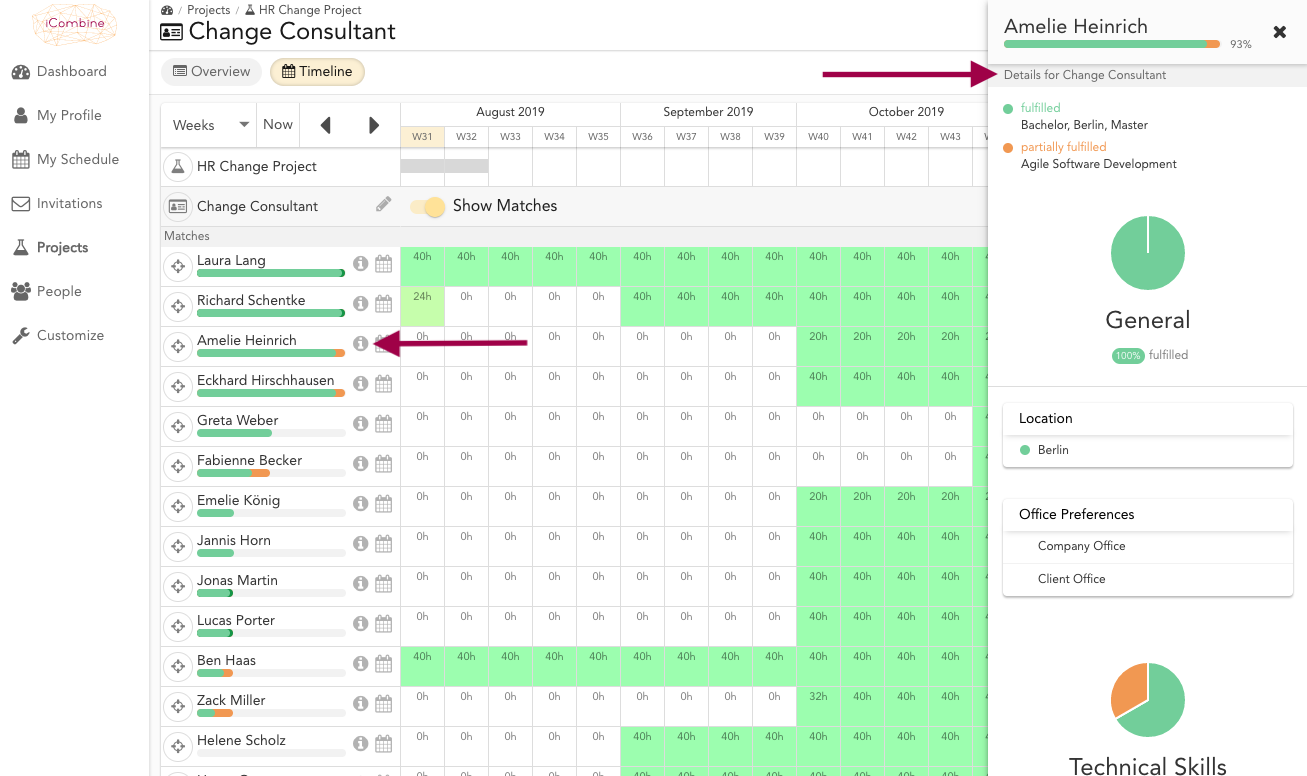
4.3 See the Fit between Experts and Project Role Requirements in the Timeline
Click on i besides an expert name to see the fit accuracy here in the timeline. On the right side, you will see hwo well the expert fits to the project role requirements.
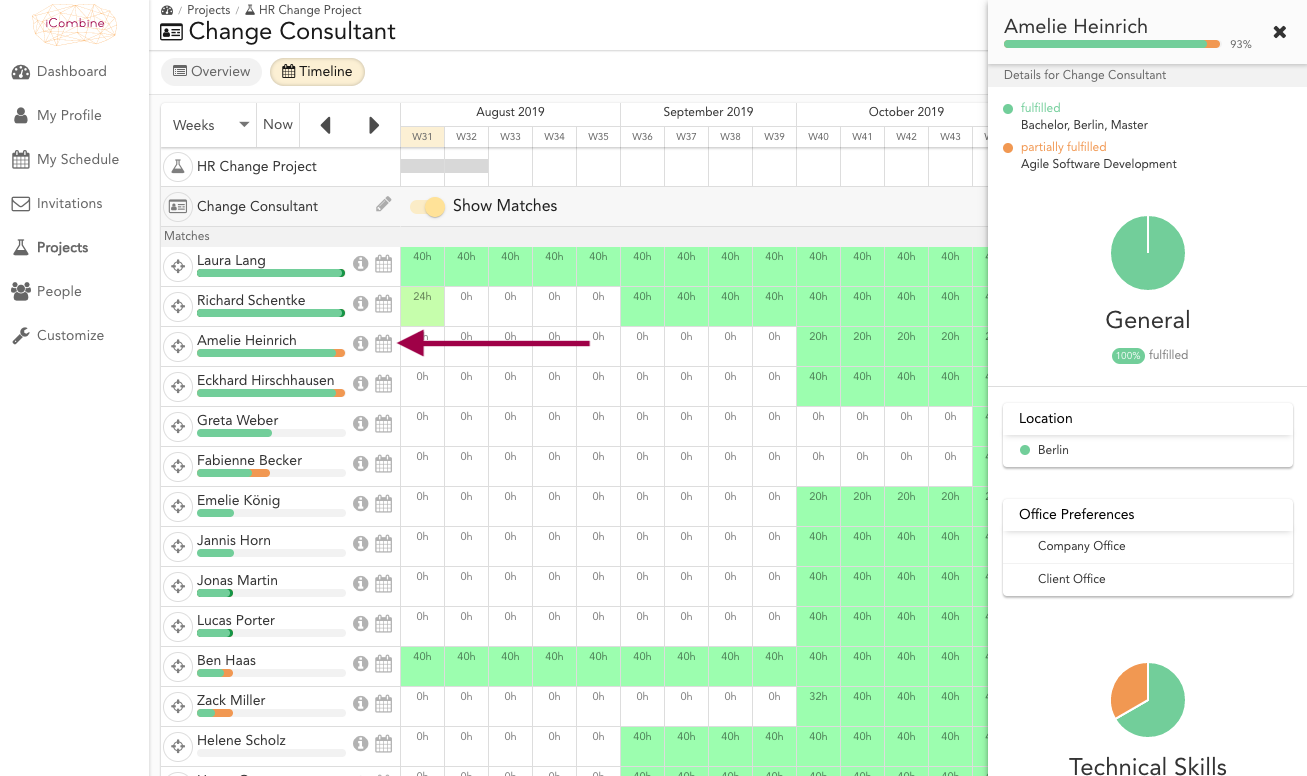
4.4 Switch from the Timeline into the Calendar of an Expert
Click the calendar icon to go to the calendar of an expert. There, you will see details about other assignments the expert is staffed on, information about time off, and other project role matches for that expert.
5. Invite Experts to a Project Role
5.1 Navigate to a project role
To involve your experts in the staffing process, you can ask who is interested in the project role. For projects that have been set to Public, this happens automatically. Private projects allow you to invite specific individuals.
In the details view of a project, click on a project role name.

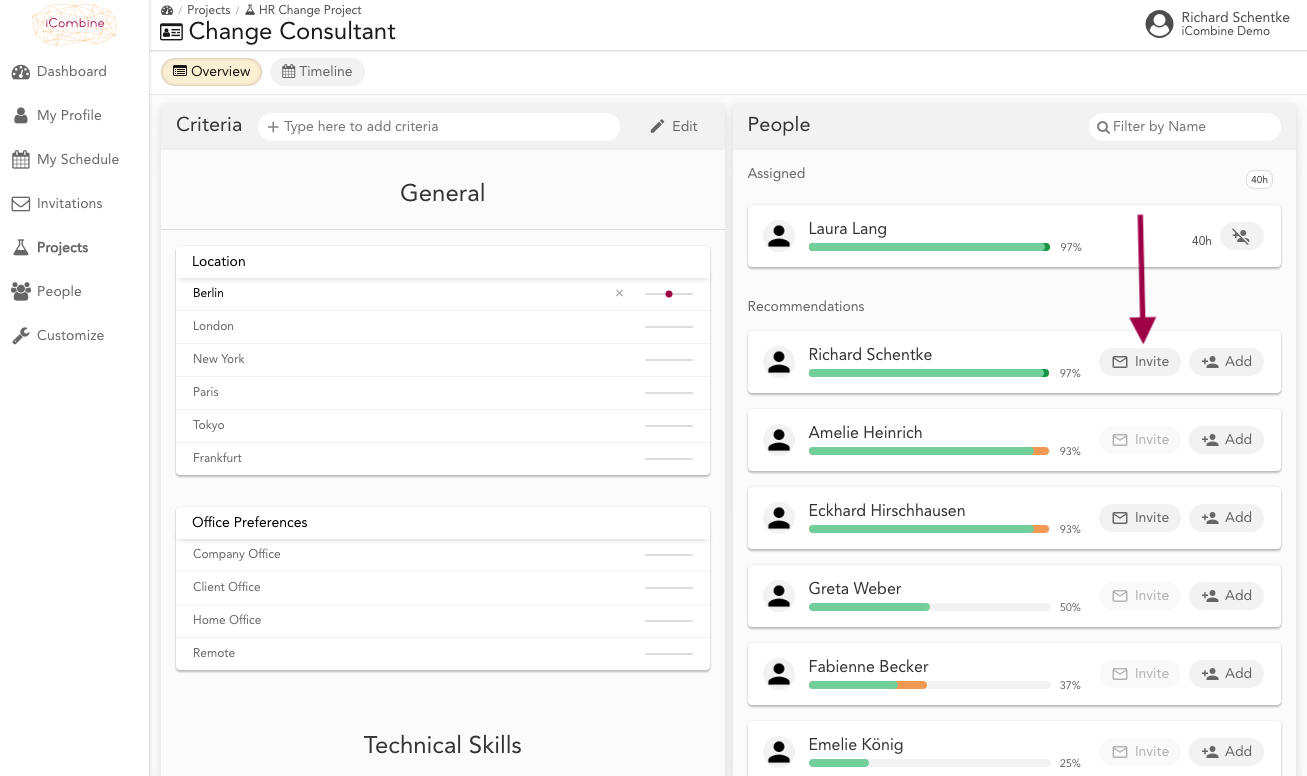
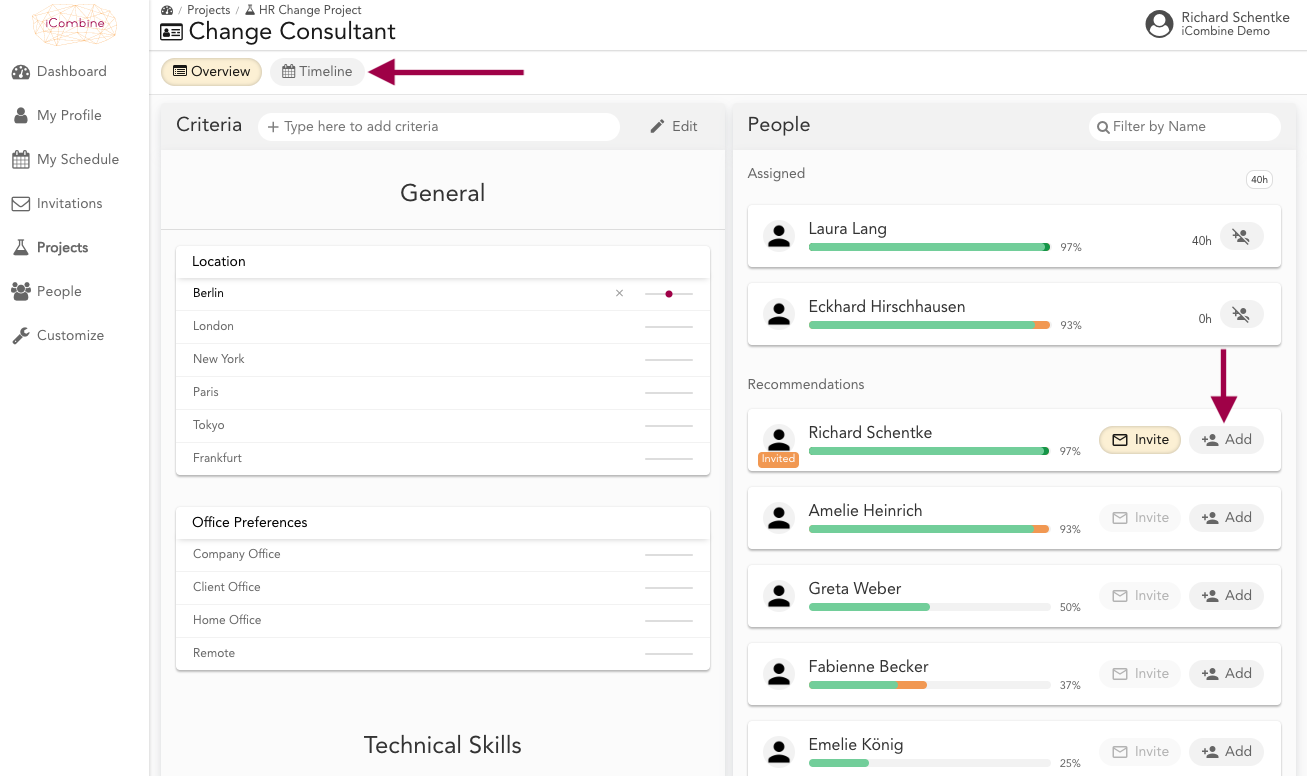
5.2 Invite Experts from the Recommendation List
On the right side of the screen, you see the recommended experts, ranked according to fit. To invite single experts, click on Invite. This sends out an email notification to the expert with the request to accept or decline the invitation.
5.3 View the Reaction of Experts to your Invitation
Once you clicked on invite, the expert will automatically move under the Invited label, which gives you an even better overview of the status. Here, you also see the reaction to the invitation that the expert received via email: Invited, Accepted or Declined.

6. Assign Experts to a Project Role
6.1 Assign Experts without booking Time
You can assign people to a project role by clicking Add. The added person will automatically receive an email notification containing a project link.
In the timeline of this expert, a light gray bar will be displayed for the entire duration of the project.
To continue booking times, go to the Timeline of the project role.
6.2 Book Time in the Project Role Timeline
To assign an expert to the project role, you can use drag & drop to select a time period in the project role timeline. Then, on the right side, you set details. Finally, click on Update Assignment.
By the way, if the weekly working hours of an expert have been set to zero hours, then it is not possible to book times in the timeline. Read on to see how you can assign people to project roles without booking hours.
6.3 See the Assigned Time
Besides the name of the assigned expert, you see how much time was booked. Switch back to the Overview to see the times of all project roles.