Customize the Profile Calatog
iCombine allows you to establish a common language for competencies, experiences and interests in your organization. With the creation of the profile catalog, you as admin define the building blocks of that language.
1. How to create a Profile Catalog
Whenever employees edit their own competence profile, or when project planners define the required competences for a project role, they select predefined categories and criteria from this standardized catalog. This saves a lot of time for all users because nobody has to search for buzzwords or hashtags, nor think about which terms other people in the software could have used to describe themselves.
In the following steps you learn how the profile catalog can be defined “from top to bottom”. Alternatively, if you already use a skill matrix or skill list in your organization, you can leverage that information and build the profile catalog “from the bottom up”.
After preparing and defining the contents of your catalog, this guide will show you how to set up a profile catalog in iCombine based on the structure you have created.
1.1 Structural Overview
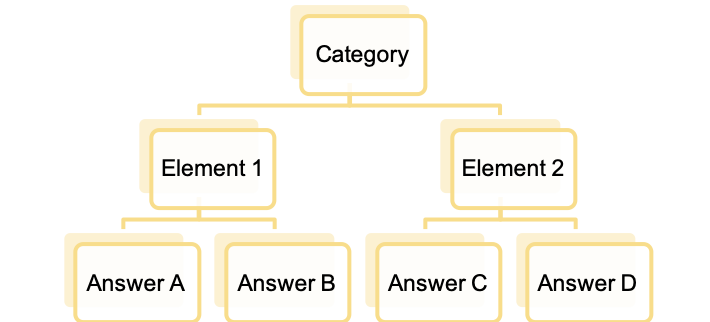
Before you start fully utilizing iCombine, we recommend that you collect ideas for the profile catalog in a spreadsheet or similar document and iterate over it with your colleagues. The goal is to create a kind of tree structure with several categories on the top, containing elements and answers at the bottom.
1.2. Prepare Categories
sothFirst, think about which parent categories in your organization are relevant to describe the characteristics of employees or project role owners. Typically, categories are based on the individual skill domains or work areas in your organization. These are, for example, subjects such as:
- – Marketing
- – Design
- – Sales
- – Administration
- – IT
If your company is very specialized in a certain domain (for example in “IT”), we recommend that you split this domain (“IT”) into several sub-categories, like:
- – Technical Skills
- – Programming
- – Databases
- – Embedded Systems
- – Web Development
Please also consider other categories, for additional information such as:
- – General information (which has no direct relation to other skill domain), or
- – Personal characteristics (preferences, leadership skills, hobbies, etc.)
The initial list of categories will make it easier to identify the actual elements in the next step. Feel free to refine, re-organize and rename your categories while you are developing the profile catalog of your organization.
1.3. Prepare Elements in the Categories
Once you have identified the general categories, you define all the various elements inside of each category. Elements are concrete areas of competence within the respective categories.

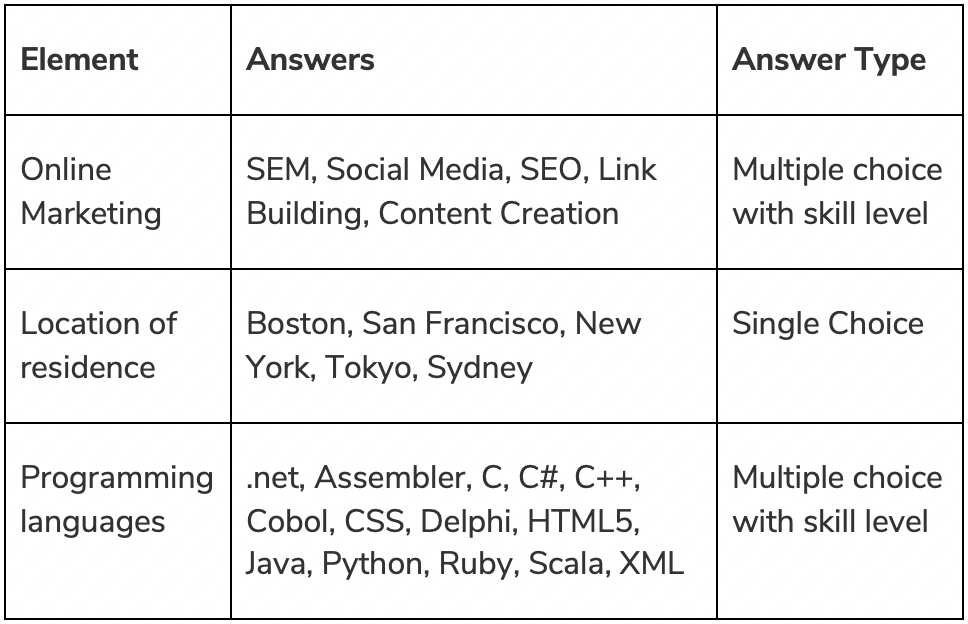
1.4. Prepare Answers in the Elements
You can now define as many answers as you want for each element. Responses represent detailed skills, experiences, personal traits, and other characteristics within the area of competence. At the same time, you can specify how employees or project planners can respond when creating a profile. For each element you need to define the type of answer you want to get. You can choose from:
- – Single choice
- – Multiple choice
- – Multiple choice with skill level (1-5)
- – Yes / No (Boolean)
- – Short text
- – Long text
- – Number
We recommend that you use plenty of “multiple choice with skill level” elements, as they are the commonly used element for a skill-based profile catalog. Moreover, try to limit your elements to not more than 20 answers. In case you notice that your elements contain many answers, try to split the answers into several, more specific elements. For example, in a category, you could create the element Specializations, and classify special skills as answers.
Once you agree with your colleagues on a first version of related categories, elements, and answers, you can start creating the profile catalog in iCombine. Of course, this catalog can be extended at any time.
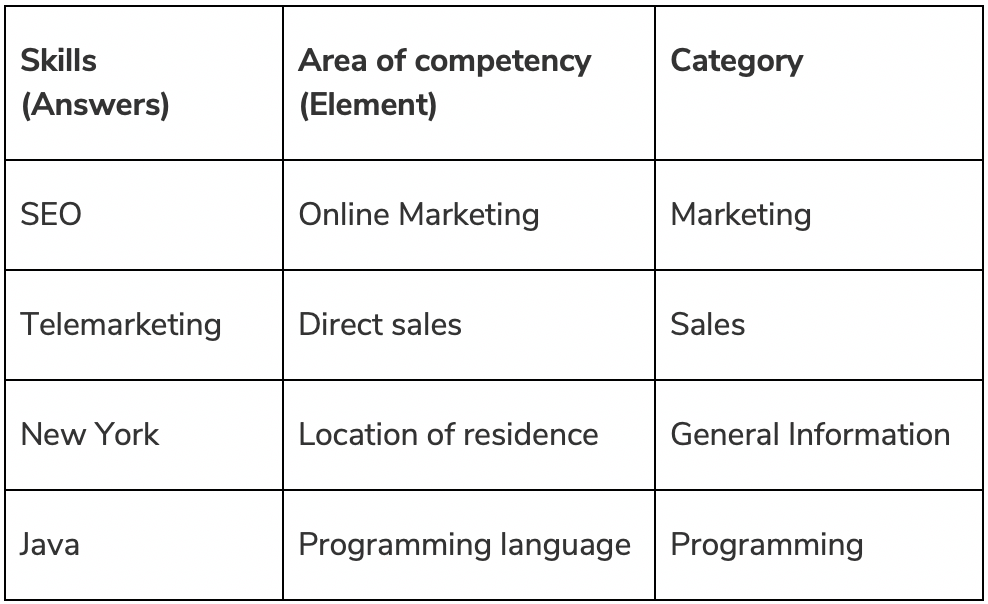
1.5. Start with Competences, Experiences, Interests, and other Characteristics
If you already have a kind of skill matrix in your organization, you can also build the tree structure “from the bottom up”. To do this, you list all skills, experiences and other characteristics (see answers in step 4) in a table and think about suitable areas of competence (which map to elements, see step 3) for each answer.
It may be that at first there are also several areas of competence in which an answer could fit. Write them down and decide later on which area of competence fits best, or whether areas of competence can even be split up.
Given the areas of competence that you have identified, start drafting suitable parent categories, as described in step 1.
Finally, you can sort the list by elements and specify which answers (step 3) you want to assign to each element.
2. Update the Profile Catalog in iCombine
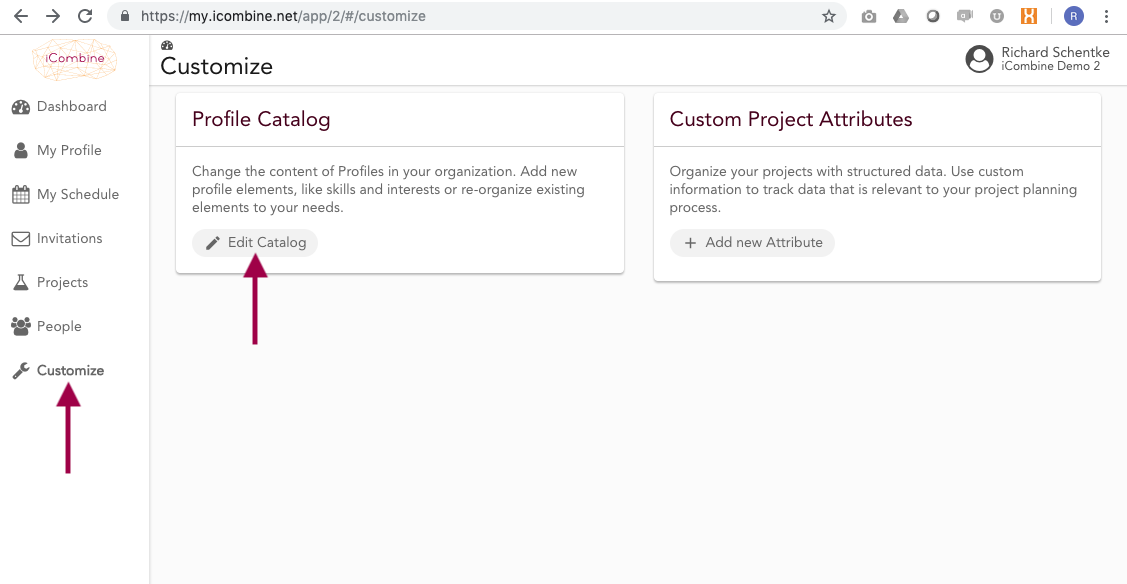
Log-in via https://my.icombine.net. If you have not registered yet, please use the specific link we sent you in advance.
As Admin, click Customize and then Edit Catalog. This will open the Profile Catalog Editor, which allows you to add and edit categories, elements and answers.
If you do not see these menu items, then you have no admin rights. Please contact your workspace admin in this case.
3. Add Categories to the Catalog
3.1 Create a new Category
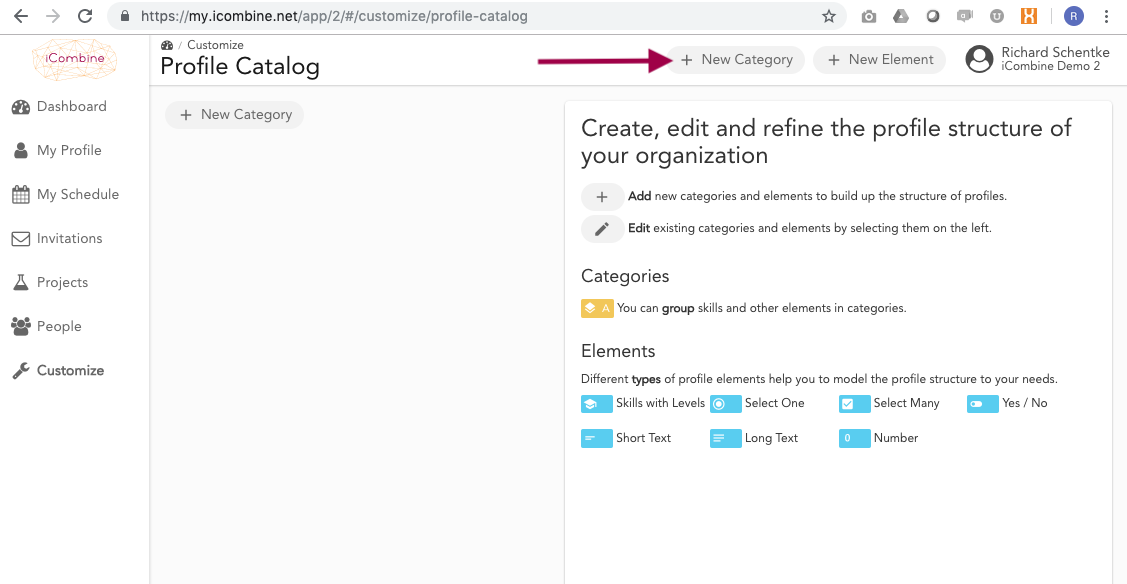
On the right side you will see the instructions for building the profile catalog. Select + New Category to create a new category.
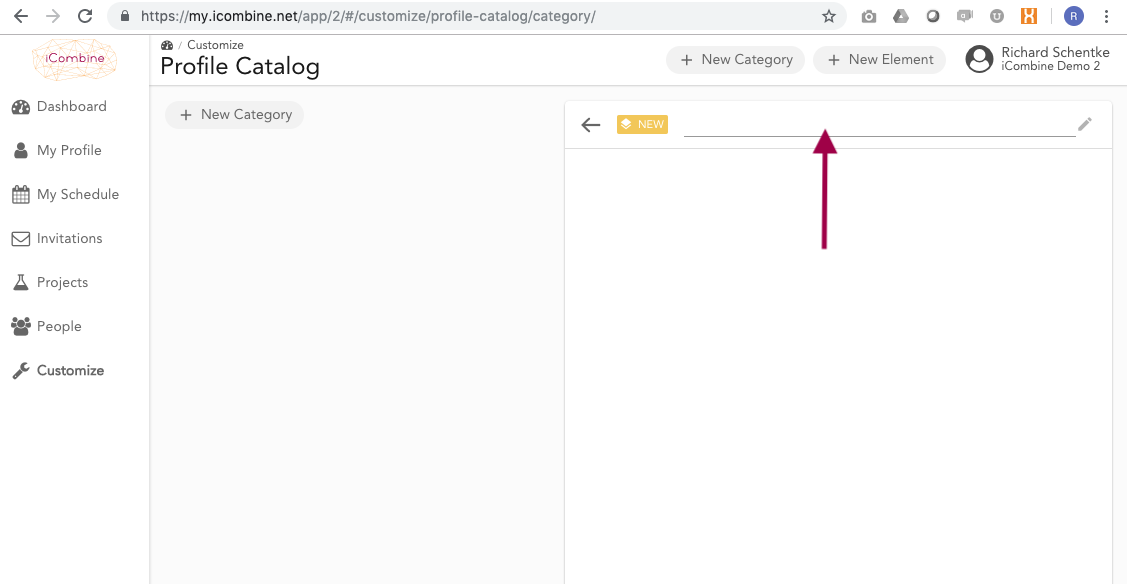
3.2 Give a Name to your Category
Now enter the name of the first category and press the Enter key. You can create as many categories as you want.
If you have created several categories, you can change the order of the categories and their elements at any time by dragging and dropping. Note that this also changes the structure of the employee profiles, which always correspond to the structure of your profile catalog.
4. Add Elements to the Categories
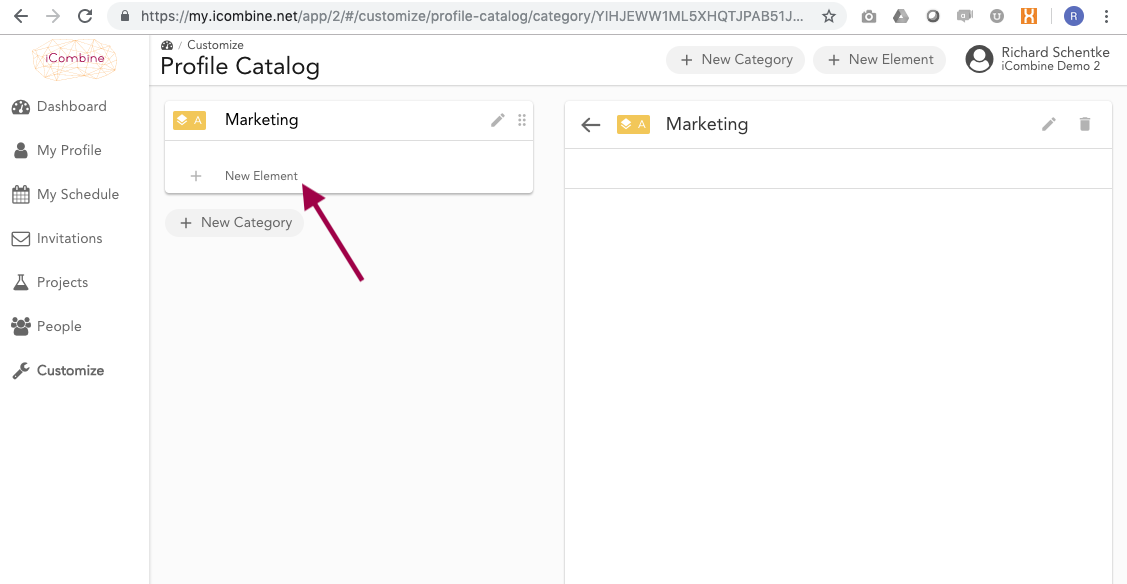
4.1 Create a new Element
Create a new element by clicking + New Element.
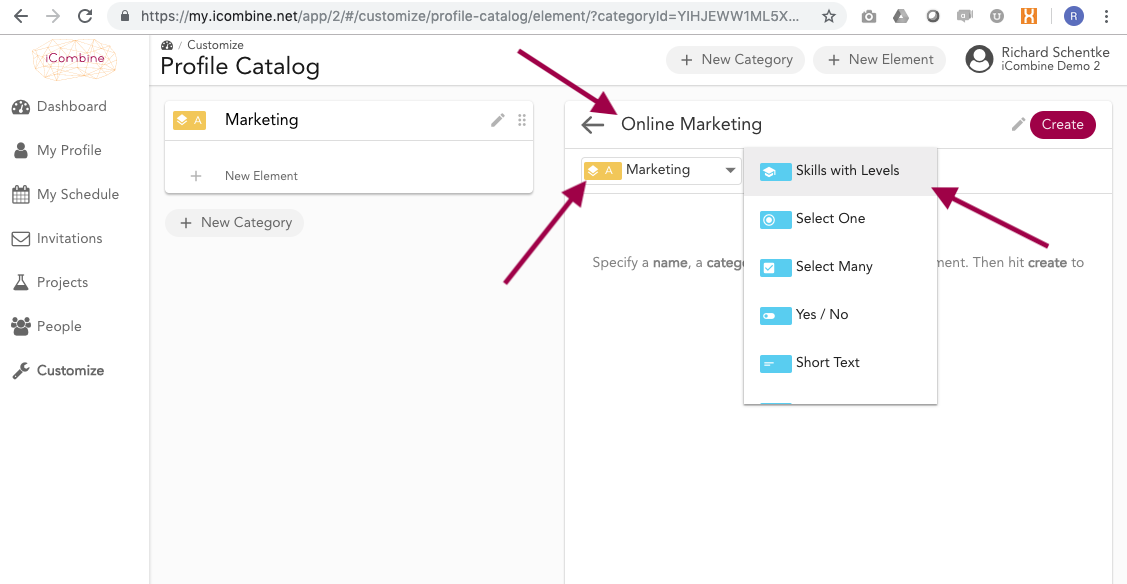
4.2 Give a Name to your Category and select a Type
Give a name to the element in the upper right corner and select a yellow category below it (if not already selected automatically). Select a blue type to the right of it. Then click Create. You now have the opportunity to create as many elements as you like within the category.
You can change the order of the various elements in the categories at any time. You can also assign elements to other categories. Note that every change will also change the structure of the employee profiles, which always correspond to the structure of your profile catalog.
5. Add Answers to the Individual Elements
5.1 Formulate Questions for each Element
To make it easy for your employees to create a competency profile, you now formulate an appropriate question for the element in the first line.
In the second line, you formulate the question for the project planner, who is looking for specific competences for a project role.

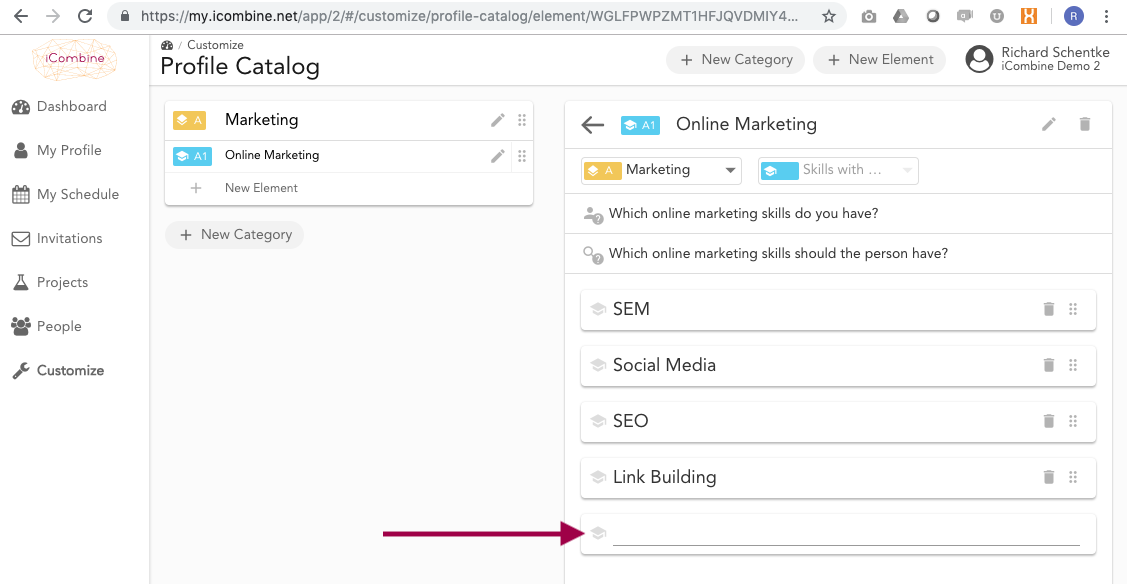
5.2 Add Answers to the Element
Using the empty row at the bottom, you can add answers to an element that supports it (single or multiple choice). You can change the order of answers, using the re-arrange symbol to the right: start dragging the answer and drop it to the right location.
6. Add Descriptions and Links to Categories and Elements
As a workspace admin, you can add descriptions to categories and elements within the profile catalog. You can also add links to external and internal sources to further explain the competencies in your catalog, or to refer to your own definition of skill levels.
Thus, your experts will get a better understanding about the meaning of competencies and interests when creating their own profile. Likewise, your project managers will have the same understanding about each competency they select when creating project role requirements.
6.1 Navigate to a Category or Project
Within the category or element (example: the element Project Management Software), click on the field Add a description. This will open the text editor.

6.2 Use the Text Editor
You can now update the description of the selected category or element by typing in the text field. You may enter up to 1000 signs.

6.3 Format your Text
You can use the toolbar to format your text.

6.4 Add Links: Hyperlinks
To hyperlink parts of your text, please select the text first and then click on the link-icon. In the appearing pop up, you can then paste a URL. Afterwards, click on the blue Save.

6.5 Add Links: How Links are Shown
The hyperlinked text is now shown in blue color and underlined. This is especially helpful when you have very long links that you want to hide behind a word.
Alternatively, you can also add URLs starting with https:// directly in the text field. They will be shown in full length.
Do not forget to save your description when you are done. You can come back and edit your description and links any time.

Important: When you add a description to an element with the answer type skills with levels (as in the example above), it will remove the default link leading to our skill level description. If you still want to refer to our skill level definition provided in our knowledge base, please add this text to your description again:
Select skills with interest and level – how to pick levels
FYI: If you do not add your own description to this answer type, our default text will remain and be visible in the profile editor or role search.
6.6 How Descriptions and Links are Shown in the Profile Editor
Your description and links will now be shown to all users in their profile editor.

When selecting the desired parameters for a project role, project managers will also see this description and the links.

Congratulations, you learned how to define the first category, the first element, related questions, the appropriate answers and descriptions. Now continue by building up and completing your profile catalog with these steps.